Some time ago I received a copy of Beer Traveler Magazine in the mail. In it there were several beer vacation itineraries, including a two week trip to Belgium that caught my eye! You see, I had a big birthday this year, one ending in zero, so I wanted to commemorate it with a really fun and interesting trip. Accordingly, I decided to plan a trip around the itinerary they suggested. I'd like to share it with you because I think it worked pretty well, and I had an awesome time!
First of all, I went with my girlfriend, who is not a big beer drinker, though she likes some beer and is a good sport about trying it. We didn't want to have to drive everywhere, particularly if we are drinking, so we opted to stay in two places and take trains everywhere--usually an easy option in Europe. We stayed in Gent (or Ghent or Gand, in English and French, respectively) and Antwerp (or Antwerpen or Anvers in Flemish and French). This allowed us to cover the West and South of Belgium from Gent and the North and East of Belgium from Antwerp. Only having one week limited us a bit, and we didn't want to just spend each day drinking, but sightseeing and enjoying Belgian culture as well.
Day 1 (Sunday):
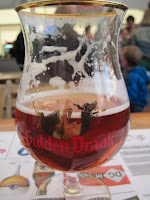 |
| Gulden Draak 9000 |
|
Arrive in Gent
We stayed at the
Charme Hotel Hancelot, which was excellent! On arrival we discovered that Gent was having a
big music festival, which had free music and stages all over the downtown area. This was fantastic from an entertainment standpoint, but it meant that the bars and restaurants might be more crowded than normal--and reduced the beer menu at at least one place. Nevertheless, we headed into the Oud Stadt (old city) to check it out, and found that they had beer tents set up where you could purchase some pretty good beer, including Leffe Blonde, Leffe Bruin, Gulden Draak, etc. I LOVE a country with good beer, and so we enjoyed some music, some beer and had fun. I had a Leffe Blonde at one stage, and then a Gulden Draak 9000 (Quad) that was delicious while we watched a rock band at another stage. Then we went for Moules et Frites at a restaurant on De Graslei, which is a beautiful spot, but a main site of the festival to so hard to appreciate it for its beauty.
Day 2 (Monday):
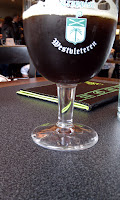 |
| Westy 12 |
|
What beer lover's trip to Belgium would be complete without a pilgrimage to
Westeverleteren (Abbey St. Sixtus)? Not mine, that's for sure! Of course, if you are going to get there, it turns out that you must do it by car or bicycle, because public transportation is not even CLOSE to convenient--so we rented a car. I also wanted to bring back some beer, after all,
Westy 12 is supposed to be the best in the world, so I tried calling to reserve a crate but was unable to get through at the right time by getting up at 4am! Nonetheless, when we got there, I was able to buy a six pack of
Westy 8, which also scores pretty respectably, at In De Vrede, their shop and restaurant. Of course, I had to have a glass of the 12, and I also tried the blonde (not so great, IMHO). The coolest thing was being there, which is one of those beer experiences.
After Westverleteren we drove toward the coast, and ended up stopping at a nice little town called Veurene to buy some bread, cheese, and meat. I, of course, had to get some local beer as well, and the woman we spoke with at the grocery suggested three:
Poperings Hommel Bier,
Sporkin, and
Boeteling, which I purchased and drank later. All three were good, but not great. Popering is an interesting place (we drove through it) for two reasons: It was a big WW I battlefield, and it has a hop museum and festival! I also caught sight of some hop bines growing along the road as we drove. All in all it was a good beer day!
Day 2 (Tuesday):
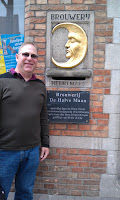
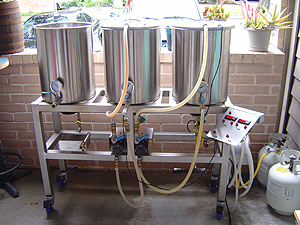
We got up early and after breakfast we took the train from Gent to Brugges. While this is not the biggest beer destination on the planet, you can't go many places in Belgium without finding something beer related and (usually) interesting! Here we found the brewery De Halve Man, where they brew
Bruggse Zot and a couple other beers that are very nice! This it the ONLY brewery tour we took, and it is also the best tour I've been on anywhere. The woman who was our guide was extremely knowledgeable, and we (literally) saw the brewery from bottom to top, ending with a stop on the roof to enjoy the view! Along the way we saw modern and old brewing equipment including open fermenters, a kuhlschip, and stainless tanks and brewing gear. They no longer use the open fermenters or kuhlship, but they keep them around (probably expensive to remove) as sort of a museum exhibit. They also used to do their own malting, so you get to see the malting floor and kiln. We followed the tour with a lunch in the courtyard and an unfiltered Zot (only served at the brewery), then headed off to explore more of this beautiful city.

We stopped at the old Gruuthus, now a museum of unrelated things, but you get the importance of Gruit (or Gruut in Flemish) when you see how nicely this place was appointed! We finished the day with a stop at
De Garre, with a glass of their own
tripel, which was quite nice. This place is a very cool old, old bar that is off in a tiny little alley you would only find if you are looking for it. Thanks to the article from Beer Traveler and the nice person at the Brugges tourist office, we knew how to find it, and surprisingly, so did a lot of others. We found a table on the 2nd floor and the bartender served us up there, which was great! Outside there was a nice little canal, and I would have loved to linger, but my wonderful GF had other plans: a birthday dinner in Gent at Faim Fatale, so back to Gent we went! Dinner was wonderful, as was the
Rochefort 8 that accompanied it-absolutely one of the best beers of the trip!
Day 3 (Wednesday):
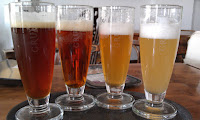 |
| (l to r) Bruin, amber, blonde, wit, all made with Gruit. |

We decided that we needed to explore Gent more thoroughly than we had on Sunday, so we took the day and did it in a leisurely way. Our first stop was at
Brewery Gruut, the only brew pub in Gent, and one of the few women head brewers. Of course, I had to try the Gruut beers, since it is the only place I've been where they make commercial beer without hops! I was underwhelmed by the Wit (on the right), but the bruin and amber were delicious, and the blonde was pretty good. I would definitely buy some if it were available in the US! Alas, it is not exported yet. I discovered that you could get it in a number of places in Gent, at least.
After a visit to the castle, and a few interesting stops to watch the Tour de France and various bands, we ended the afternoon at
Het Waterhuis, and here's where we hit a shortcoming of the festival: limited beer menu! I had a couple of nice local beers, MAMMELOKKER, and a Floris Frambozen, which was absurdly sweet. We struck up a nice conversation with a local retired gentleman, who is a sculptor and was very interesting. And we watched the end of the day of the Tour de France to see how it came out before we headed back to our hotel to freshen up, then out to dinner. No unusually good beer for dinner, however, just a Westmalle Dubbel.
Day 4 (Thursday):
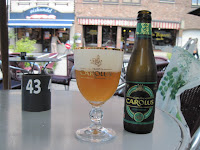
We decamped to Antwerp and settled into our hotel (the Hilton, right on the Groenplatz), before grabbing some bread and cheese and hopping a train to Mechelen, home of the
Het Anker brewery, which brews Gouden Carolus. This is an interesting town, and unfortunately, one of those breweries (like Gruut) where you need 12 people to have a tour. They also have a nice hotel and pub at the brewery, but rather than head that far from town, we elected to check out the Vismarkt (Fish Market) area and have a beer there, then explore the town, and end up at another highly rated bar near the other train station. And that's what we did!


The bar we started at was Den Akker (on the Vismarkt), and we ended at T' Afspraak, which was a neat old bar with a nice modern, garden section. They had a very impressive beer selection, but between the two places, I had to try a number of the Gouden Carolus beers:
Hopsinjoor,
Ambrio, and of course the
Classic. After that, we headed back to Antwerp (it is a 25 minute train ride), and had a nice dinner on the river called
Zuiderterras, where I had a
Tongerlo bruin. It was a nice beer, but the food was better than the beer.
Day 5 & 6 (Friday/Saturday):

You can't go to Antwerp and not see Ruben's house and museum. Pieter Paul Rubens was perhaps the best painter to come out of Belgium, and apparently quite accomplished in other areas as well. So on Friday morning, off to visit the house we went. I managed to set off the alarm one time by leaning too far over the rope in front of the exhibits, but it was a great thing to see!
We followed up with another museum, and then searched the city for Kulminator, #8 on the
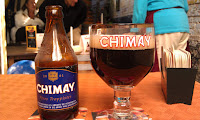
top 150 places to have a beer. We found Kulminator, but discovered that it didn't open until 4, so we put it on the back burner until after dinner. We finally got there around 8, and I had a 3 year old Gouden Carolus (on draft), which was quite nice. I confess that I was underwhelmed by the bar, however. The article had led me to believe that this would be a really fantastic, happening place, but in reality, nobody in Antwerp seemed to know anything about it. It is truly a beer geek's bar, and there's no reason anyone else would go there. In fact, when I was in Antwerp on business in November of last year, I tried to find it, even giving the cabbie the actual address, and he couldn't find the place! Nevertheless, they do have an amazing selection of vintage beer, and we went back the next day (earlier--before dinner) and I had a 2001
Chimay Grand Reserve (blue) and a
Maredsous Tripel (on draft) that were really wonderful, and we sat in the garden out the back.
I finished off the trip with a nice Duvel, while we sat in the Groenplaats watching the sun set. It was a great trip, and I had some wonderful beer and great experiences (lots of sight seeing not discussed here, too)! Belgium is a wonderful country to visit, and I feel like we left some great things to come back to on the next trip. The people we met were friendly and helpful, and we enjoyed the scenery, and even the rain!
I hope that the links I posted above will be useful. Gent, is a great city, and if the festival is not on, even more historic sights await. During the festival it is fun, but not quite as easy to view the medieval buildings in the old city. Antwerp is also beautiful, and has a lot to offer. We deliberately skipped Brussels because we thought it would be fun to be more off the beaten track. The only regret about that is that we didn't get to see the Belgian National Day celebration in Brussels, but that's OK!


