Tuesday, November 25, 2014

Moving up to All Grain

My friend Andy wrote:
I am just starting to investigate mashing so don't really know what is involved. ...  I was at a brew store today and they pointed at a large modified tank cooler that they were using for mashing. I guess I would be interested in what the proper equipment would be in doing my own mash and also if the gains over purchasing extracts are worth the additional investments in mashing equipment.

It wasn't that long ago that I was in the same situation as Andy, and I thought I would respond to this in a more permanent way, in hopes it will help others. 

Why change from extract to all-grain?

I made the change because of two things:
  1. All grain was cheaper per batch than extract (after you figure in the cost of some additional equipment).  The cost savings is because you are buying grain and extracting the sugars (mashing) yourself, rather than buying LME or DME. It costs me $10-20 for a 5 gallon batch of all malt beer (adding fruit or other adjuncts might add to the cost).  DME is close to double the cost, LME is a bit more, I think.
  2. Control over the process.  When you mash you can control whether you get more or fewer long chain sugars (controlled by mash temp).  That's really the main thing.  When you use extract you are at the receiving end of someone else's process, and they are  mashing at a specific temp (probably 152 deg F) which is sort of a typical medium bodied beer.  

In making the change I gave up a couple things, too:

  1. Time. On average it takes my 6 hours to brew a batch of beer using the all grain method, where it took 3 when doing straight extract, and maybe 3.5 hours doing a partial mash.  So one question to ask yourself is whether your time is more valuable.
  2. Space.  I now have about 3-4 times the equipment that I did when I did when I was doing extract.  Some of that is stuff I would have gotten do do extract anyway, but mash tun with a false bottom is not one of them, nor is a hot-liquor tank. It takes a lot more space to store that stuff!

So what's the proper equipment?

 Brew in a Bag

The latest "innovation" in home brewing came out of Australia, where it is very popular.  It is called "Brew In A Bag", and if I were starting all-grain again, this is what I would do. I use it now for small batches.  Basically, you use a single pot to mash and boil. You can do this by using a fine-mesh bag (http://www.brewinabag.com/) to hold line the pot and hold your grain during the mashing process, when the mash is over, you simply (but with great effort, if you are making a big batch) remove the bag with all your wet grain and let it drain back into the pot.
  With my 1.5 gallon batches on the stove, this is no big deal.  With a 5 gallon batch and 10 lbs of grain (dry weight), I would need a pulley, which I really can't install in my kitchen.  Why do it? Simplicity!   If you are brewing outside, or in a basement, you just need to have something over the brew pot that you can use to remove the bag.  Your equipment needs are small, and you get the same results as with any all-grain technique. However, you have to have a big enough pot to handle mashing with ALL the liquid you need to brew, and the extraction may be slightly less efficient than when you are fly sparging, so you need a little more grain (negligible cost, however).


3-vessel Setups

 The more traditional method is to use 3 vessels:
  1. Hot Liquor tank - holds your hot water for mashing and sparging (requires a heat source).  I have a 7.5 gallon aluminum turkey fryer pot that I put on top of my gas stove.  When I was doing extract, this was my boil kettle.
  2. Mash/Lauter tun - This holds your grain at mash temp (or temperatures, if you are step-mashing).  You can control mash temperatures in several ways,depending on your approach: direct heat, indirect heat (HERMS or RIMS, which circulate hot water from your hot liquor tank through a coil to heat the mash or circulate your mash water through a coil in the hot liquor tank to heat it), or infusions of hot water.  Yup, it is confusing!  I have a converted 10 gallon Rubbermaid cooler
    with a stainless false bottom, and use the infusion method.  This way I don't need heat.
  3. Boil kettle - this is where you boil your wort, simply enough.  It needs to be big enough to do a full boil, which means roughly 50% -75% larger than your batch size. I have a 9.5 gallon stainless pot that is about 17" in diameter and covers two burners on my stove.
Now, it is not sufficient just to get the 3 vessels, you also need a way to transfer the wort and hot liquor around.    I started with the gravity fed method, which was highly dangerous!   Because you have to get the hot liquor tank higher than everything else, you need to use milk crates or some sort of structure (there are lots of plans for this online) to create a stepped system, the lowest level of which is for the boil kettle and is high enough off the ground that you can just run off the boil kettle (which must be on a burner) into your fermenter.  Everything else goes up from there!  I was using a 7 gallon bottling bucket as my hot liquor tank, and had to climb on a stepladder with 7 gallons of hot water to put it up on its platform--talk about dangerous!

Better still is to use a pump! Not only does this save your back, but it will most likely keep you from getting scalded by falling 170 degree water!  Probably the best $100 I ever spent!  In the picture above, you can see the pump moving the wort from the mash/lauter tun to the brew pot, while the hot liquor tank gravity feeds sparge water into the mash/lauter tun.  This simplifies the process considerably because you can push liquids uphill.

Brewing Structures

Some folks use brewing structures, which seem to me to best fit outdoors, especially if you can keep them in a shed or garage.  These are permanently put together and often have burners and gas lines welded into them, along with pumps and control panels. The Brutus 10 (http://www.alenuts.com/alenuts/brutus.html)
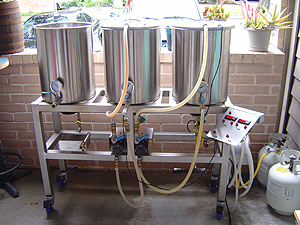
is an example of an "open source" plan for such things, and if you would rather buy one, there are commercial examples like the Ruby Street Brewery (http://www.rubystreetbrewing.com/tp60/page.asp?ID=318741) which comes in a variety of sizes, as well as others made by Blichmann and More Beer, which are all excellent and work well.  The biggest issue is that you need to have the space and good ventilation (hence garages, and outdoor brewing).  My ex-wife kicked me out of the house (for brewing) because she didn't like the smell of wort boiling, so I ended up on the deck with my turkey fryer burner and my gravity fed set up.  I aspired to something like Brutus, for sure!

Electric Brewing

The other option is to go electric!  My friend Mike has an electric brewery he made himself, and it is really fantastic!
We can brew in his basement,as you can see.  He has 2 pumps to circulate wort and transfer from place to place.  Best of all, on a cold winter day, you aren't out in the snow and ice, you can be warm in the basement with no worry about exhaust fumes.  You can buy or make (http://www.theelectricbrewery.com/) these systems, but if you are going to make your own, you need to be really comfortable working with high-voltage systems in wet conditions--not for me!   Next time I have a basement, I'm planning to buy the electric brewery equipment.

Conclusion

So, in the end, what do you need, Andy?  It really depends how you want to do your brewing, and how much you want to spend for your initial investment.  You can buy a lot of this stuff used on Craigslist as people either stop brewing or move up to some other system. Of course you can support your LHBS or buy online.  I bought most of my stuff at Austin Homebrewing or Northern Brewer. 

Tuesday, August 19, 2014

How I stopped worrying and learned to love the fruit!

Raspberry Porter!


For years I have been planning to brew a chocolate porter. I found a recipe in Zymurgy (July/August 2007) for a chocolate -cherry porter shortly after I started brewing, and I filed it away against the time when I could actually make it happen. It sounded great, but got lost somewhere in my pile of recipes that I had also saved against the time when I could get around to brewing them.  Oops!

Finally, last year I bought a can of raspberry puree, with the intention of making a chocolate raspberry porter--something in flavor that I imagined would be like the muffins of the same sort.  This year, I finally got to make the beer, and it turned out to be both better, and easier than I imagined.

Step 1: Brew the base beer

I had to start with a recipe, and found one on the internet that sounded interesting.  Not the Zymurgy recipe, but another porter recipe, which I adapted a bit. Here it is:


Ingredients
Amt Name Type # %/IBU
10 lbsPale Malt, Maris Otter (Thomas Fawcett) (3.0 SRM)Grain157.4 %
2 lbs 8.0 ozMunich Malt (9.0 SRM)Grain214.4 %
12.0 ozCaramel Malt - 60L (Cargill) (60.0 SRM)Grain34.3 %
9.6 ozMelanoidin (Weyermann) (30.0 SRM)Grain43.4 %
8.0 ozChocolate Malt (450.0 SRM)Grain52.9 %
0.70 ozNorthern Brewer [9.70 %] - Boil 60.0 minHop626.5 IBUs
0.50 ozNorthern Brewer [9.70 %] - Boil 30.0 minHop79.6 IBUs
0.28 tspIrish Moss (Boil 10.0 mins)Fining8-
1.0 pkgSafAle English Ale (DCL/Fermentis #S-04) [23.66 ml]Yeast9-
3 lbs 1.0 ozRed Raspberry Puree (12.0 SRM)Extract1017.6 %

Gravity, Alcohol Content and Color

Est Original Gravity: 1.093 SG
Est Final Gravity: 1.023 SG
Estimated Alcohol by Vol: 9.3 %
Bitterness: 36.1 IBUs
Est Color: 25.5 SRM
Measured Original Gravity: 1.069 SG
Measured Final Gravity: 1.010 SG
Actual Alcohol by Vol: 7.8 %
Calories: 231.5 kcal/12oz 

Mash Steps

Name Description Step Temperature Step Time
Mash InAdd 19.94 qt of water at 166.9 F152.0 F60 min
Mash OutAdd 10.05 qt of water at 206.2 F168.0 F10 min

Sparge: Fly sparge with 1.47 gal water at 168.0 F 
What I wasn't thinking about was that this was already a high gravity recipe at 1.069--high for the style, anyway.  On top of that, I was going to add Raspberry Puree that would add more gravity points on top of that  to make it even stronger.  Oh well, it would be a Raspberry imperial porter, I guess!

So I brewed, and I fermented. And it finished at about the right final gravity, 1.020.  The biggest trick was managing the temperature using a cooler and regular additions of ice to keep it under 70 degrees. The flavor and mouthfeel weren't quite what I imagined, being a bit thinner and less roasty than I anticipated.  However it was good!

Step 2:   Secondary on Raspberry! 

For almost 3 weeks, the beer sat on raspberry puree. When I finally kegged it the gravity was 1.016, so another few percent of alcohol! I put it on CO2 at about 2.6 ATM for a couple of weeks, and it carbonated nicely.

The results

The beer has a really lovely raspberry flavor and aroma, but is not particularly sweet. It is really delicious, but does not have the chocolate overtones I would have liked, nor does it taste particularly like a porter. I think next time I brew it, I will change the base to be lower in gravity and use a robust porter as the starting point so it will have more of a standard porter starting point. Mind you, this is not a bad beer, but I expect if I were to enter it in a competition as a Raspberry Porter, I would get dinged because it did not taste like a porter, although the raspberry aroma and flavor are wonderful!
This was actually not my first, but the first I did to really go with a bold fruit. Last year I co-brewed an apricot Saison with my friend Mike, and that also came out well, but apricot is such a mild flavored fruit, it was almost hidden.

Please reply with your fruit beer experiences. I would love to hear what you have done that has worked, or not!

Tuesday, July 8, 2014

The Importance of Calibration

Skipping neatly over the last twelve months since the AHA Conference in Philadelphia, it is time to get back to blogging.  2014 has been an interesting brewing year, and I will post on some other topic that have come up, but I wanted to start with one that is really critical, and I have been overlooking.

When I started brewing, I started with extract and recipes that someone gave me.  Since I was dealing with known quantities and gravities (add 6.6lbs of extract to 6 gallons of water), there was not a lot of need for calibration, as long as I could measure accurately.

When I moved to all-grain brewing, things changed! Suddenly, it was much more complex, since the number of variables increased--something I understood at a high level, but didn't really appreciate. These are some of the things that affect your brewing:
  • How good the crush of your malt is--finer isn't always better, you need intact husks to make a filter bed, etc.
  • Grain temperature
  • Weight of your mash tun (mine is a 10 gallon Rubbermaid cooler with a stainless steel false bottom)
  • What your strike water temperature is, and whether it will get your single infusion mash to the desired mash step temperature.
  • How big is your mash tun?  Can you do a 5 gallon all-grain version of that Old Numbskull clone, or, because it would require 25lbs of grain, do you need to scale back the grain to 20lbs and plan to add some DME in the boil?
  • How much dead space is there in your mash tun, and how much water will the grain absorb? How much extra strike/mashout/sparge water do you need to get 8 gallons in the brew kettle?
  • What is your boil off rate?  In other words, how much water will boil out of your wort each hour?  This is critical, and it is affected by the strength of your boil, geometry of your kettle (as in how much surface area).  A short fat kettle may boil off more than a tall skinny one because there is less surface are in the skinny kettle, even if they hold the same volume).
  • How much wort will the hops absorb?
  • How much dead space is there in your kettle? That is, when you open the valve in the bottom of your kettle, and let all the wort run out, how much will be left in the bottom? This shows a dip-tube to reduce the amount of dead space and get every last drop of wort that you can!
Whew!  That's a ton to worry about, and that's why we often use brewing software.  When I started on all-grain, I bought a copy of ProMash, because that's what the BFD club members I talked to were using.  I figured out all my parameters, and hey, everything worked.  Every so often I swapped out equipment, which caused some minor changes, but things worked pretty well until I changed my brewing software to BeerSmith and bought new carboys.

Why would carboys cause problems?  Well, I switched from glass to the plastic kind because of two things:
  • The weight of the glass carboys is a pain.  I'm really not interested in lugging so much around and risking my back!
  • Breakage!  I read some stories about broken glass carboys that scared me, frankly!  People have severed nerves, lost a lot of blood, etc., and for what?
 So I moved from 6.5 or 7 gallon glass carboys to 6 gallon plastic.  That meant my batch size had to go down, and that's where the trouble started!

 BeerSmith is a fine piece of software, but I discovered that it was less "forgiving" than ProMash when it came to calibration.  I had been making 6 gallon batches (that is 6 gallons going into the carboy, 5.5 gallons out after trub settled).  I had also been kind of lazy about actually measuring the dead space in my mash tun and brew kettle.  Only myself to blame there!  I did calculate the boil-off rate, at least.  But I plunged in with BeerSmith and used a sort of default equipment profile that was close to what I had--but not exactly.  Finally, I used BeerSmith to scale the ProMash recipes from 6 gallons to 5, but wasn't using an accurate equipment profile so it (apparently) didn't work out so well.

Suddenly my batches were coming out weird.   Pre-boil gravities were low.  I ended up with 4 gallons in the fermenter instead of 5.  Original gravities (post-boil) were off, or required supplementing with DME.  In some cases after I tinkered, I ended up with a higher post-boil gravity, and had to dilute---which was OK because I collected less in my fermenter than the recipe predicted.  In short, things weren't working the way they were supposed to!

This past weekend I measured the dead space in my mash tun and fermenter.  I trust BeerSmith can figure out all the rest of the data from that, and I am looking forward to my next brew, to see how close I get to hitting my numbers.  But the moral of the story is, measure, so you know how your equipment will behave!  I will post a follow-up when I make my next batch.